| .. | ||
| .vscode | ||
| data | ||
| include | ||
| lib | ||
| src | ||
| test | ||
| .gitignore | ||
| compile_commands.json | ||
| partition.csv | ||
| platformio.ini | ||
| README.md | ||

ESP32 WebSocket Audio Client
This firmware turns your ESP32 device into a WebSocket audio client for Elato, enabling real-time conversations with AI characters.
Hardware Setup
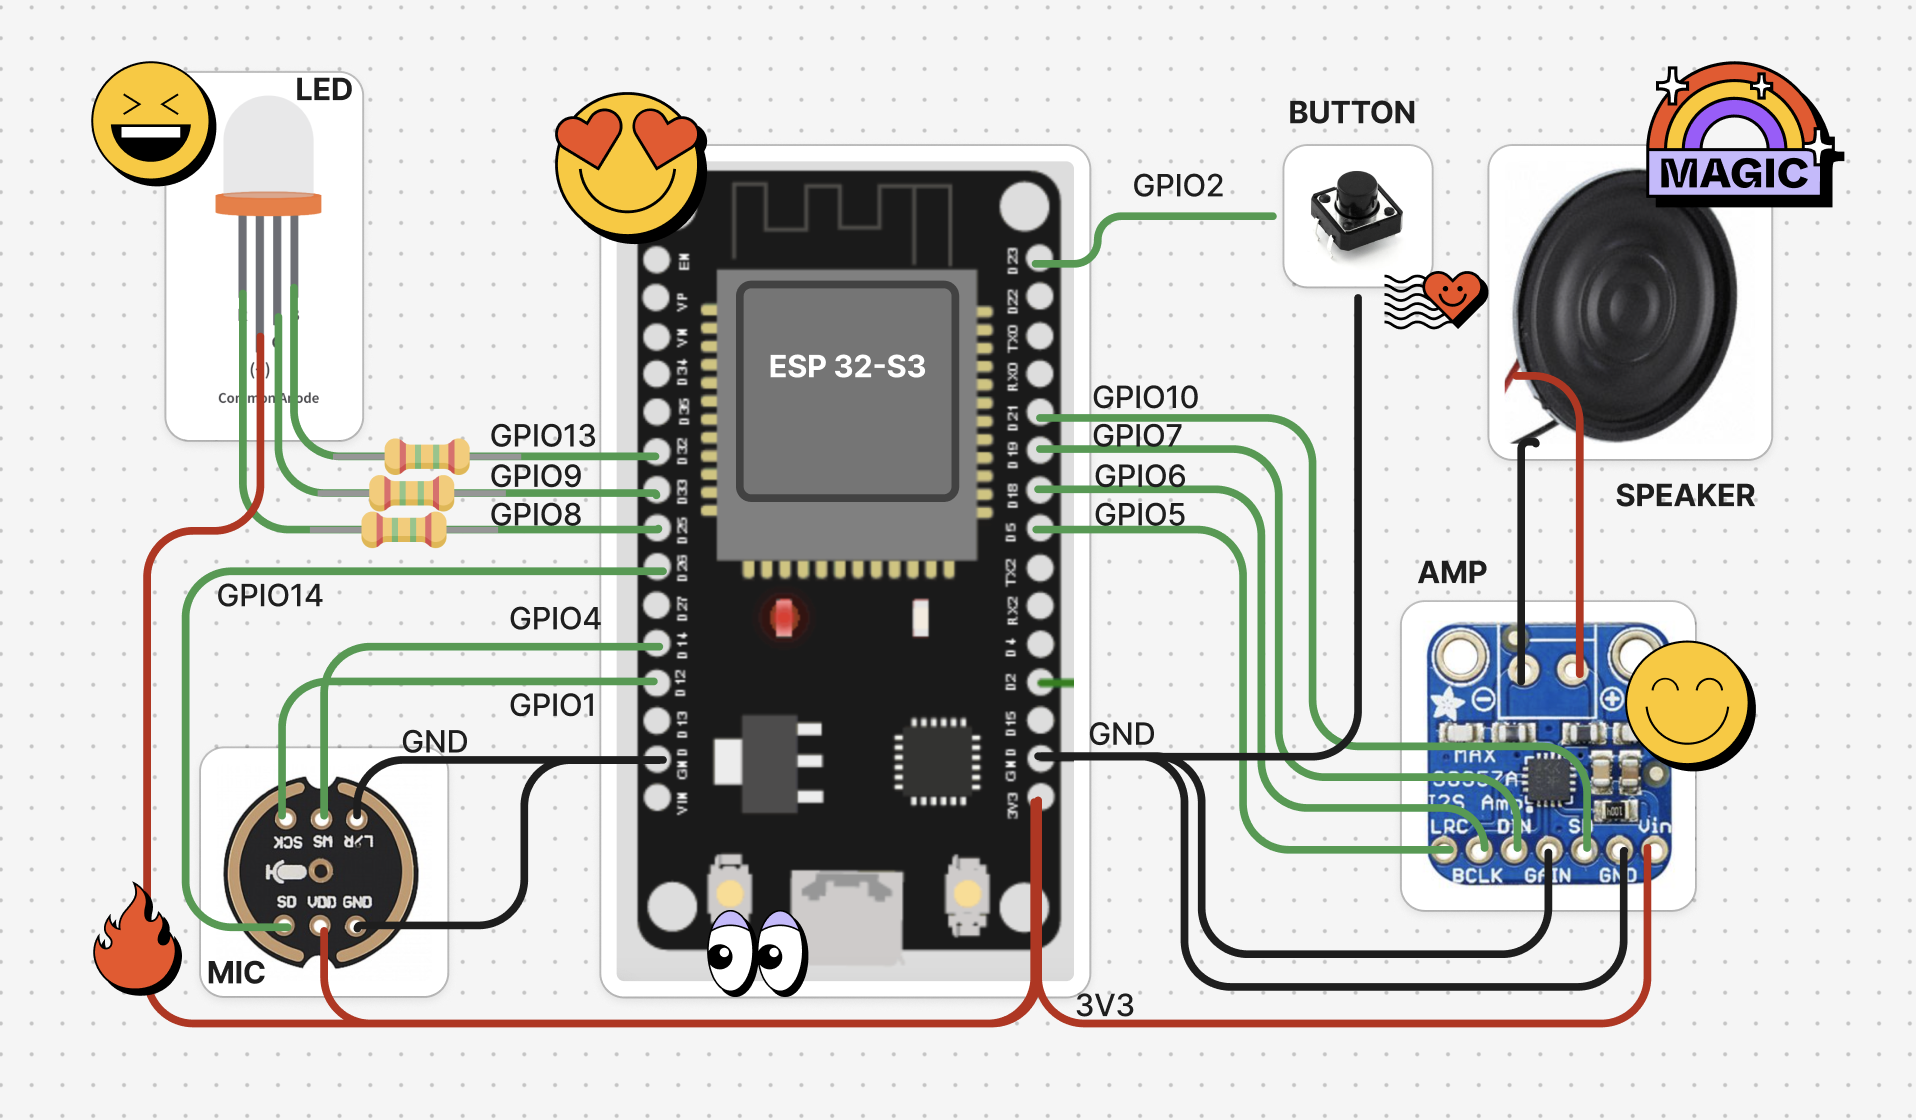
Components Needed
- ESP32-S3 board
- I2S MEMS microphone (INMP441 recommended)
- I2S speaker with amplifier (MAX98357A recommended)
- Microspeaker
- Button/Touch sensor and RGB LED (optional but recommended)
Pin Connections
| Component | Standard ESP32 |
|---|---|
| Microphone | |
| SD (Data) | GPIO 14 |
| WS (Word Select) | GPIO 4 |
| SCK (Clock) | GPIO 1 |
| Speaker | |
| WS | GPIO 5 |
| BCK | GPIO 6 |
| DATA | GPIO 7 |
| SD (shutdown) | GPIO 10 |
| Control | |
| Button | GPIO 2 |
| LED (Blue) | GPIO 13 |
| LED (Red) | GPIO 9 |
| LED (Green) | GPIO 8 |
Software Setup
Using PlatformIO
- Install Visual Studio Code and the PlatformIO extension
- Clone this repository
- Open the project folder in PlatformIO.
Open > Open Project > firmware-arduino - Edit
src/Config.cppwith your server details:- If using locally: Set your computer's IP address in
ws_serverandbackend_server - If using production: Ensure proper certificates are set
- If using locally: Set your computer's IP address in
- Build and upload to your ESP32
To use locally:
-
Find your local IP address:
- View your Wifi IP when you click on Wifi Settings > Your Wifi Network > Details, OR
- On macOS/Linux: Open Terminal and run
ifconfig - On Windows: Open Command Prompt and run
ipconfig - Look for your active network interface (WiFi:
en0on Mac,wlan0on Linux,Wireless LAN adapter Wi-Fion Windows) - Note the IP address (e.g.,
192.168.1.100)
-
Update firmware configuration:
- In the firmware project, set
DEV_MODEin Config.cpp - Update the WebSocket server IP to your local IP address
- In the firmware project, set
NVS Storage
We store the following data in Non-Volatile Storage (NVS) on the ESP32:
- Auth token: The supabase auth token that is used to authenticate the device with the backend server.
- Factory reset: Whether the device has been factory reset.
- Wifi credentials: The wifi credentials of the device.
First-Time Setup
- Power on your ESP32
- Connect to the "Elato device" WiFi network from your phone/computer
- A configuration portal will open (or navigate to 192.168.4.1)
- Enter your home WiFi credentials
- The device will restart and connect to your WiFi
Usage
- Power on the device
- The LED indicates status:
- Green 🟢: Setup mode and websocket/wifi is not connected
- Blue 🔵: Device is speaking
- Yellow 🟡: Device is listening to user
- Red 🔴: Processing user request
- Cyan 🩵: OTA in progress
- Magenta 🩷: Soft AP mode
Troubleshooting
- If connection fails, check your WiFi signal and server details
- Monitor serial output at 115200 baud for detailed logs
Deploying and Advanced Config
- Add your Deno and Vercel server Root CA to
config.cpp. You can find the Root CA of vercel by running the following command and picking the Root certificate in the chain:
# vercel server root ca
openssl s_client -showcerts -connect <your-vercel-deomain>.vercel.app:443 </dev/null

# deno server root ca
openssl s_client -showcerts -connect <your-deno-domain>.deno.dev:443 </dev/null
- Edit
Config.cppto customize:
- Server addresses and ports
- Audio sample rate (default 24kHz)
- Pin assignments for different boards
-
For development, uncomment
#define DEV_MODEin Config.h to use local servers without SSL. To deploy to production, comment out#define DEV_MODEand set the proper server addresses and ports. -
To use the button functions, uncomment
#define TOUCH_MODEin Config.h